
See the Character Design Tutorial on Cgtuts+
Speed Art Video
Watch this awesome speed art video to see how this artwork came together.Tutorial Assets
The following assets were used during the production of this tutorial. Please download them before you begin. If they are not available, you may need to find alternatives.- Strawberry Renders by Nacho Riesco (In Download Files)
- Half-cut Strawberry
- Kichen Scene
- Metal Texture
1. Create a Template
Step 1
Create a New Document (File > New). The size doesn't matter since we will just be building a template in 3D. I'm starting at 8 x 5.5 inches.
Step 2
On a new layer, Use the Brush Tool to paint in dots to represent the placement of the strawberries.
Step 3
Copy (CMD/CTRL + C) and Paste (CMD/CTRL + V) the dots until you have several rows. (As a temporary solution, I've identified the strawberry that will be the focal point as a green dot.)
Step 4
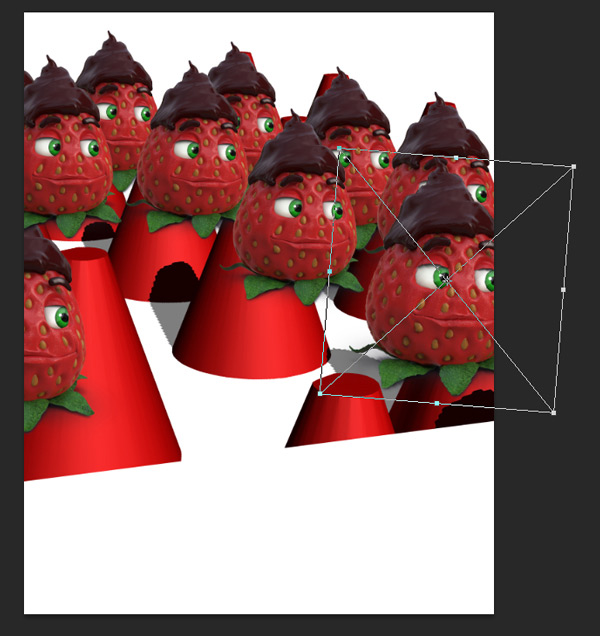
We will now start to form some rough shapes that will act as placeholders in our scene. Right-Click and select New 3D Extrusion from Selected Layer.

Step 5
Make sure to select the 3D object layer in the 3D Panel. In the Properties panel, click the Coordinates Tab and rotate 90 degrees on the X axis.
Step 6
Select the Mesh Tab and adjust the Extruded Depth to 0.
Step 7
Next, click the flyout menu in the 3D Panel and choose Snap Object to Ground Plane.
Step 8
We want to make these shapes into the approximate size of a strawberry. To do this, click the Cap Tab and adjust the Bevel and Inflate settings to make a cone.
Step 9
In the 3D Panel, select the Current View Layer. Use the camera controls in the top menu bar to move the camera into a position that works for you.
Step 10
Pay attention to how each placeholder shape is positioned. Edit the source file (click on the Edit Source button) of the 3D layer and move the dots around until they are adequately placed. This may take several attempts at editing the source file, checking the progress and adjusting the camera.


2. Set Up the Initial Image
Step 1
We will now set up a new photoshop document (File > New) to create the image for our ad. Our final ad will be 8.5 x 11 portrait plus.25 in bleeds on all sides. This means we will need to make the document 9 x 11.5.
Step 2
Go back to our 3D template file and press CMD/CTRL + A to select the entire canvas. Next, press CMD/CTRL + Shift + C to copy a flattened version of the contents of the canvas.
Step 3
Paste (CMD/CTRL + V) the contents onto a new layer called Template.
Step 4
Position the Template layer in the top half of our canvas. Resize if necessary using Transform (CMD/CTRL + T). Since this is just a template layer, we can scale to any size.
3. Extracting the 3D Rendering
Step 2
Open the StrawberryRender_01.jpg file. Double click the layer to unlock.
Step 5
Create a new layer filled with black directly below the rendering.
Step 6
Use the Magic Wand Tool (W) to select the white space around the rendering. This tool rarley makes a good selection. We are only using the tool to help us start a selection. We will clean it up in the next few steps.
Step 7
With the selection active, click on the Create Layer Mask icon in the Layers panel.
Step 8
The Properties panel should show the mask's properties. Select Mask Edge and adjust the settings so the edges appear smooth and clean.
Step 9
It may be necessary to manually adjust the mask. The black background should help us spot any excess white areas that our first attempt couldn't get. To fix these, make sure the mask's thumbnail is selected and use the Brush Tool (B) to edit the mask. Remember, black hides and white reveals.
4. Preparing the Eyes
Step 1
Zoom into the eyes and use the Elliptical Marquee Tool (M) to select the Irises. Copy and Paste each the Iris onto a new layer. Name the layer Iris.
Step 2
Click the Lock Transparency button on the Iris layer. Hide the background layer and use the Clone Tool to clean up the iris, hiding the left over parts of the eyelid.

Step 3
Add and Inner Shadow Layer Style to help fill in the edges around the iris.

Step 4
Next, use the Pen Tool to draw a path around the whites of the eyes. Repeat with the other eye.
Step 5
In the Paths panel, rename the new path Eyes. Next, Right-Click the path and select Make Selection.
Step 6
Copy and Paste the selection to a new layer. Rename the layer Whites.
Step 7
Create a new clipping layer to the Whites layer and use the Brush Tool to paint over the existing eyes. Blend the eye by using a low opacity brush and paint with colors sampled from the white part of the eye. Eventually, we'll be left with just a white eye.


Step 8
Make the Iris layer a clipping layer to the Whites layer. Move this Iris layer around to see the eyes move.
Step 9
We can add some more depth to the eye with some simple tricks. Create a new layer called Specular Highlight and use the hard-edged brush to add a dot of white that overlaps the iris and the pupil.
Step 10
Next, on a new layer called Eye Reflection add a larger white dot that falls of the upper part of the eye. Reduce the Opacity to 20%.

Step 11
Referring back to the original rendering, we can see that the eyelid creates a shadow over the eye. We need to replicate this. On a new clipping layer called Shadow, use the Brush Tool to paint in a subtle shadow. Set the Blend Mode to Multiply.

5. Adding Shadows to the Strawberries
Step 1
The next step is to add some shadows to ground the strawberry. But first, we need to extend the canvas. Select the Crop Tool and use the handles to extend the canvas on both sides.

Step 2
Create a new layer called Base Shadow below the strawberry. Use a medium-size, soft brush, with a low Opacity setting and paint in some dark shadows close to the base of the strawberry. Make sure the Blend Mode is set to Multiply. It may help to create a temporary background layer filled with white to see the progress better.
Step 3
Next, we need to blend the shadow better using a blur filter. Go to Filter > Blur > Motion Blur.
Step 4
Now, add the Gaussian Blur filter (Filter > Blur > Gaussian Blur).
Step 5
Create a new layer and use the Elliptical Marquee Tool to make and oval at the base of the strawberry.
Step 6
Fill the selection with Black and apply a wider Motion Blur and a larger Gaussian Blur. Make sure to set the Blend Mode to Multiply.


Step 7
Add a new layer called Ambient Shadows and paint in much softer shadows around the base of the strawberry. Make sure the Blend Mode is set to Multiply.
Step 8
Lastly, we are going to use the Crop Tool to shrink the Canvas to fit our artwork. Select the Crop Tool and move the handles inward until they snap to the edge of the content in the canvas. Make sure to hide any background layers.
6. Placing the Strawberries
Step 1
Select all layers and Right-Click and Convert to Smart Object. Not only will coverting to a Smart Object help organize our files, but it will also make it easier to add changes to the strawberry later.
Step 2
Rename the new Smart Object to Strawberry and drag it to our working document.
Step 3
We want each strawberry to be its own Smart Object (not just a duplicate of the original). Having each strawberry as its own, separate Smart Object will allow us to edit each set of eyes independently. In order to do this, we need to make a New Smart Object via Copy. We can access this option by Right-Clicking the Smart Object.
Step 4
Continue to make Smart Objects via a copy and place each one according to the template. Resize each strawberry to match the perspective.
Step 5
Prepare the StrawberryRender_02.jpg file in the same way as the other strawberry file; remove the background and add shadows. Do not extract the eyes, yet. We will do this later. Convert these layers to a Smart Object and name this layer Scream.
Step 6
Move this Smart Object to the working document.
Step 7
For the half-eaten strawberry, go back to the file StrawberryRender_02.jpg. Select the original strawberry layer with the mask.
Step 8
Next, click on the canvas and drag that layer to our working document. At this point, we want to apply the mask to the layer. Go to Layer > Layer Mask > Apply (this will make it easier to manipulate later). Now, place this strawberry on its side as a placeholder—we will edit this later. Convert this layer to a Smart Object and name it Bite.
Step 9
Lastly, we want to go through and organize our rows. Notice that our scene consists of four rows of three strawberries. Group each row of strawberries, naming each group accordingly.

7. Adding Expressions to the Strawberries
Step 1
Since we've gone through the effort to extract the eyes of the strawberries, we can easily edit them by going back into to each smart object (do this by double-clicking the Smart Object layer). Once inside the Smart Object, move the Iris layer to make the strawberry look in a random direction. Adjust the eyes for each strawberry.
Step 2
Go into the Scream Strawberry and apply the Layer Mask to the layer. Go to Layer > Layer mask > Apply. This will permanently delete the masked pixels.
Step 3
Next, use the Liquify Filter to exaggerate the expression on the strawberry. I've increased the size of the eyes and mouth as well as the brow line.
Step 4
Next, extract and rebuild the eyes using the same techniques in Section 4.
Step 5
As an optional step, you can apply the Liquify technique to the other strawberries in introduce more randomness.
8. Adding Bite Marks to the Strawberry
Step 1
The next step is to create a strawberry that appears half eaten. Start by opening the Bite Smart Object.
Step 2
Add a new layer filled with white behind the strawberry layer. This will help us to see our progress better. Next, use a Layer Mask to mask around the edge of the strawberry to reshape its body (and hide some of the leaves). I've used the Pen Tool to help me make a smooth selection.
Step 3
Place the Strawberry layer in a group and add a Layer Mask to the Group. Use this mask to mask out the strawberry's face. Try to make the empty space resemble bite marks.
Step 4
Use the Patch Tool to clean up the areas of the face that are still exposed.
Step 5
On a new layer, below the strawberry group, paint in the inside of the strawberry using a red color. Make sure to include bite marks. Name this layer Base Color. Note: I've used the vertical guides to ensure the bite marks line up properly. This is important for the next few steps.
9. Texturing the Bitten Strawberry
Step 4
Next, we need to add some texture to the inside of the strawberry. Open the image of the half-cut strawberry and use the Path Tool to make a selection around the strawberry.
Step 2
Copy and Paste the selection to a new document. Select the Lock Transparency button in the Layers panel, and use the Spot Healing Brush to touch up any imperfections.
Step 3
As an initial step to color the strawberry, create a new clipping layer filled with pink.
Step 4
Set the pink layer's Blend Mode to Color and the Opacity to 37%.
Step 5
Merge these layers and copy the strawberry texture to our working scene.
Step 6
Make this layer a clipping layer to the Base Color layer.
Step 7
Rotate and Transform (CMD/CTRL + T) this layer so that it fills most of the inside of the strawberry.
Step 8
Make a copy of this texture layer. Make sure to keep it a clipping layer.
Step 9
Use the bite marks as guides and use the Rectangle Marquee Tool to select one 'bite mark'. Copy and Paste Into Place (Shift + CMD/CTRL + V) the slice of texture. Convert to a Smart Object.

Step 10
Repeat the previous step for the other 'bite marks'.
Step 11
Warp (Edit > Transform > Warp) each slice of texture to follow the contours of the bite mark.

10. Refining the Bitten Strawberry
Step 1
In order to add some more definition to the bite marks, we are going to paint in highlights and shadows. Select the Spatter 59 px brush and use the Brushes panel to change the Spacing, Shape Dynamics and Scattering. This will make the brush more random.

Step 2
On a new layer, set the Blend Mode to Multiply and set the brush to a low Opacity. Select a red color and start to paint in shadows around the bite marks. Paint additional shadows on the left side of each bite mark. We will add highlights to the other side.
Step 3
For the highlights, we will work on a new layer with the Blend Mode set to Soft Light. Use a light pink color with the same brush and paint in the highlights on the rights sides.
Step 4
The next step is to address the edges of the bite marks. Currently, the transition from the bite mark to the strawberry is too defined. To fix this, go into the strawberry's mask and use the Blur Tool to blur those edges.
Step 5
Next, paint in highlights and shadows around the edges of the bite. The goal is to create the illusion that the skin of the strawberry has rounded out due to the bite.
Step 6
The strawberry looks good, but we want it to look juicier. Select all the components that make up the inside of the strawberry and Convert to a Smart Object.
Step 7
Double click the Smart Object to edit. On a new clipping layer, paint red over the entire texture. Notice that I've cleaned up the Layers panel by grouping all the texture layers.
Step 8
Set the Blend Mode to Multiply and the Opacity to 66%.
Step 9
To further tweak the color, add a Levels Adjustment Layer with the following settings. This may appear extreme, but it's necessary for the next steps.
Step 10
Save the Smart Object and return to the working document. Make sure the Smart Object is selected, the go to Filter > Filter Gallery, and choose Plastic Wrap under the Artistic Tab. Use the Settings shown.

Step 11
As an additional step, we can add a specular highlight by painting in white areas and using the Blend If sliders in the Layer Styles panel to control the highlight.

Step 12
Lastly, use the same techniques from Section 5 to add Shadows to the Strawberry.
11. Adding Chocolate Pieces
Step 1
To create the large pieces of chocolate, use the Lasso Tool and select random shapes from the chocolate topping.
Step 2
Copy and Paste those shapes and Transform (CMD/CTRL + T) them so they appear to be resting on the ground.
Step 3
Continue doing this until you have a few large pieces around the base of the strawberry.
Step 4
We will now add some dimension to these pieces. Select the Brush Tool and, on a new layer, use a dark brown color to paint in 'sides' of each chocolate piece.
Step 5
To make the smaller pieces, just use the Brush Tool set to a smaller size. Start with some initial small dots of color, then add a second, darker color for depth.
Step 6
Lastly, we'll add shadows to the strawberry and the chocolate pieces. Again, refer to Section 5 of this tutorial to add shadows.
12. Adding an Extra Leaf
Step 1
To help establish the ground plane for our half-eaten strawberry, we will add an additional leaf. To do this, make a selection of the existing leaf and Copy and Paste it below the Strawberry.
Step 2
Convert the leaf to a Smart Object and Transform it into perspective.
Step 3
Using the techniques from Section 5, manually paint in some shadows.
Step 4
Lastly, add highlights and shadows to the edges of the leaf. This will give the illusion of thickness to the leaf.
13. Touching up the Chocolate Topping
Step 1
Currently, the transition between the chocolate topping and the bite mark appears too sharp. To clean this up, we'll square off the edge of the chocolate. To start, create a new layer and use the Brush Tool to paint in a thick edge.
Step 2
To create the illusion of cracking, create a new layer and manually paint in cracks using a small, dark brush.
Step 3
Add a Drop Shadow to give the cracks some depth.

Step 4
Next, create a new clipping layer to the chocolate edge layer. Using a soft brush, paint in shadows and highlights along the edge (using darker and lighter colors). Use the Blur Tool to help soften everything.
Step 5
Lastly, using a soft brush with a low Opacity, manually paint in some variation of color on the cracked chocolate. Save the Smart Object.
14. Adding a Background and Cooking Sheet
Step 1
Go back to our working scene and go to File > Place. Select the KitchenScene_01.jpg file to place into our working scene.
Step 2
Move the new layer below all of our objects and resize (CMD/CTRL + T) and position the image so that the background appears to show just the countertop. Note: We will be blurring this image heavily, so the pixilation at this stage is acceptable.
Step 3
Next, open the MetalTexture_01.jpg and use the Spot Healing Brush to remove any imperfections.
Step 4
Use the Rectangle Marquee Tool to select a portion of the texture and Copy and Paste it into our working scene.

Step 5
Convert to Smart Object. Double-click the Smart Object to edit it.
Step 6
Create a copy of the Background layer and Add Noise. Next, Add the Motion Blur filter. This will exaggerate the grain of the texture.

Step 7
Next, reduce the Opacity slightly to expose some of the original texture.
Step 8
Save the Smart Object and go back to our working scene. Transform (CMD/CTRL + T) the new metal texture into perspective under the strawberries.
Step 9
Move this layer below the Strawberry groups and add a Levels Adjustment Layer to lighten the texture.
Step 10
Next, make a copy of the Metal Texture layer and add the Noise Filter with the following settings.
Step 11
Reduce the Opacity to 55%.
15. Adding Reflections
Step 1
Creating reflection can be tricky, especially for organic objects. Instead of spending a lot of time trying to reproduce an accurate reflection, we will use a simple technique to mimic a reflection. Start by selecting the four groups that make up the strawberry rows.
Step 2
Copy the four layer groups and merge them together to make one layer containing all the strawberries.
Step 3
Place this layer below the strawberry groups. Change the name to Reflections and apply the Motion Blur filter.

Step 4
Move the Reflections layer down a bit to make it appear like an actual reflection. Set the Blend Mode to Linear Burn and the Opacity to 73%.
Step 5
Add a Layer Mask and mask out any parts of the reflection that you see fit. I've mainly removed the 'tops' of the reflections.
Step 6
Next, use a large, soft brush to paint in some white streaks in between the reflections of the strawberries.
Step 7
Set this layer's Blend Mode to Overlay and the Opacity to around 58%.
Step 8
Lastly, sample colors from the leaves. On a new layer, paint in a harder reflection under the leaves of each strawberry using a soft brush.
Step 9
Set the Blend Mode to Soft Light.
16. Creating a Custom Alpha Channel
Step 1
In the next few steps, we will create a custom Depth Map that we can use to apply additional effects. In this case, our depth map will be an alpha map with each element shaded gray, according to the distance of that object to the focal point. To start, make a copy of the four strawberry groups.
Step 2
Right-Click each group and select Merge Group. We should be left with four layers that represent each row of strawberries.
Step 3
Start with Row 4 and adjust the Levels (CMD/CTRL + L) until the strawberries turn white.
Step 4
Do the same with the next row. However, use the Levels to make this a light gray.
Step 5
Continue working backwards until each row is a darker gray than the one before.
Step 6
On a new layer below all of the strawberries, paint in black on the top half of our scene and 50% gray on the bottom half.
Step 7
We now need to add a focal point. We will be using white to define the focal point. Using a large, soft brush, paint in a white spot on the ground plane, behind the strawberry layers.
Step 8
Use a dark gray color and paint in darker areas around the edges of the ground plane. The effect should be a radial gradient on the ground plane.
Step 9
Go through each layer of strawberries and add a clipping layer. Painting with white and dark gray, shade each strawberry so that they appear lighter the closer they are to the focal point, and darker the further out they are. Notice that I've made the face of the 'screaming' strawberry lighter, as we want that to be a focal point as well. We now have a custom Depth Map. The next step will explain how to convert this to an Alpha Map.

Step 10
Select All (Ctl + A) and Copy Merged (Shift + CMD/CTRL + C). This will copy a flattened version of our scene to the clipboard. Now, go to the Channels panel and click on the Create New Channel icon. Paste (CMD/CTRL + V) the selection to this channel. We now have a custom Alpha Map.
17. Adding Finishing Effects
Step 1
The next few steps will focus on adding some additional effects to our scene. Start by hiding the Alpha Map group. Now, go into the strawberry group and add a new clipping layer to Row 4. Set this layer's Blend Mode to Overlay and use a light blue brush to paint in some highlights around the edges of each strawberry.
Step 2
Repeat this for the other rows.
Step 3
Since we plan on adding text to the bottom of our scene, we need to lighten that area up a bit. Use a large, soft brush and paint in white towards the bottom of our scene. Set this layer's Blend Mode to Linear Dodge (Add).
Step 4
Adjust the Blend If sliders (accessed in the Layer Styles panel) to pull out some of the grain through the white highlight.
Step 5
On a new layer, use the same brush with a dark brown color and paint around the corners and edges of our canvas.
Step 6
Give this layer a Gaussian Blur and set the Blend Mode to Multiply. Reduce the Opacity as needed. This will give us a nice, subtle vignette.
Step 7
Next, we are going to use the Depth Map to add depth-of-field to our scene. To start, select the top most layer in our scene and press Shift + CMD/CTRL + Alt + E to paste a merge copy to a new layer.
Step 8
With our merged copy select, go to Filter > Blur > Lens Blur. Use the settings shown. Make sure to select our custom Alpha Map as the Source.
Step 9
Next, we will add adjustment layers that use the custom Alpha map to apply the effect. Go to the Channels panel and CMD/CTRL-click the Alpha Map's thumbnail to select.
Step 10
Next, go back to the Layers Panel and add the Hue/Saturation Adjustment layer. Since we have an active selection on our canvas, the Adjustment Layer will automatically apply a mask using the selection as reference. Click on the Mask's thumbnail and press CMD/CTRL + I to invert the Mask.
Step 11
Select the effect's thumbnail to pull up the properties in the Properties panel. Adjust the Saturation and Lightness in order to make our focal point pop more. Feel free to play around with the different adjustment layers, using the custom alpha map to selectively apply the effects.
Step 12
The last thing I want to do is to make everything a little grittier. Select the Merge Layers layer and Convert to a Smart Object. Now, go to Filter > Pixelate > Mezzotint. Use the settings shown.
Step 13
After you hit ok, go to the Layers panel and Double-click the slider icon on the smart filter that was applied to the layer. Reduce the Opacity to about 6% to scale back the effect.
Step 14
Before we save our document, we need to adjust the color mode to CMYK for the printer. Go to Image > Mode > CMYK Color. Now, we can save our document as a JPG (make sure to set the Quality to 12).
18. Finishing the Ad in InDesign
Step 1
Open InDesign and create a new document. Use the Presets to select an 8.5 x 11 portrait layout. Set the Margins to 1.0 inch and the Bleeds to.25 inches all the way around.
Step 2
Go to File > Place (CMD/CTRL + D) and select the JPG we just saved.
Step 3
Click on the document to place the image.
Step 4
In the Layers panel, Rename Layer 1 to Images and click the empty box next to the left to lock that layer's contents.
Step 5
Next, click on the Create New Layer icon and name this one Text.
Step 6
Select the Type Tool and draw out a text box over the bottom thirds of our image. Start from the left margin and end it at the bottom-right.
Step 7
Set the typeface to Myriad Pro Semibold at 26pt and type in the phrase below.
Step 8
Highlight the text and set the justification to Align Center. Hold Alt and drag down a copy of the text box.
Step 9
At this point, you can resize the text boxes so they do not overlap. This will make it easier to select either text box.
Step 10
Select the text in the second box and change the Font Size to 13 pt and type in an address.
Step 11
To change the color of the font, first go to the Swatches panel and selectblack. Click on the flyout menu and select New Tint. Set the Tint to 75%.
Step 12
Highlight the website and click on the new tint swatch to change the color.
Step 13
Lastly, look over the slogan and adjust the kerning as needed. To adjust the kerning, place your cursor in between a pair of letters that require adjusting (in this case, the "f" and "e" in "Life"). Use Alt + Left/Right Arrows to reduce/increase the spacing.
Step 14
To save your ad out for a printer, go to File > Adobe PDF Preset and choose one of the presets (for print ads, I prefer to use High Quality Print).
Step 15
Choose your location to save. On the Export Adobe PDF dialogue box that pops up, go to the Marks and Bleeds tab and check Crop Marks, Registration Marks, and Use Document Bleed Settings. Click Export and you're done.
Congratulations! You're done.
This tutorial has covered several techniques that helped us to create a polished print ad. We've created a template to help us build a better scene, manipulated 3D renderings to provide variety, and used photos to help embellish our scene. Hopefully, you'll find a few techniques in this tutorial that you can use on your next project.
Advertisement

Tuts+ tutorials are translated into other languages by our community members—you can be involved too!
Translate this postPowered by
Translate this postPowered by
About Stephen Petrany
 Designer, Instructor, and Artist.
@spetrany.
Designer, Instructor, and Artist.
@spetrany.
Advertisement


Envato Market Item
What Would You Like to Learn?
Suggest an idea to the content editorial team at Tuts+.


0 comments:
Post a Comment